Automated iOS Testing with Zucchini
This week I was looking for an appropriate testing framework for the iPad app I’m working on. I say ‘appropriate’ because the app is rather unique in that it’s very content driven and therefore it’s difficult to write tests that catch regression bugs. We had already integrated Frank and Kiwi into our app with limited success, but it’s rather difficult to write tests to see that animations are firing in the correct way or that a certain page has the correct background.
A colleague pointed me in the direction of Zucchini, an iOS testing framework that uses screenshots to verify that the app is working as expected. If you’re coming from a background of web development the idea of using screenshots to verify your app sounds ridiculous, but in iOS you are pretty much guaranteed to get the exact same screen every time (with some exceptions, like the status bar).
How it works
The Zucchini website has a short description of how the framework works:
A Zucchini feature file consists of sections bound to contexts of different application screens. Every screen you proceed to needs to be backed up by a CoffeeScript class describing all UI elements you want Zucchini to interact with as well as custom actions you feel like performing on that screen.
When you run Zucchini, it compiles screen classes into an UIAutomation-compliant Javascript scenario, and runs it with Apple’s instruments CLI tool.
(This is a rather terse description and unfortunately it seems to be a trend in what is otherwise a great framework – the documentation is very sparse.)
Zucchini uses Apple’s UI Automation Javascript framework (UIA) to run tests against your app. This framework allows you to run Javascript that interacts with Accessibility elements on your page. If you’re familiar with XCode you will have seen this little panel in StoryBoard:
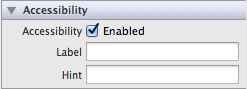
The label you use here can be used to look up elements in your Javascript code. For example, if we give a button the label ‘Done’, we should be able to tap that button in Javascript by running the following script against UIA:
UIATarget.localTarget().frontMostApp().mainWindow().buttons()["Done"].tap()The UIA API is fairly intuitive and well documented, the only part that can make it a bit tricky is that elements in the view will usually follow a hierarchy which you must traverse. You can also easily make an element accessible in code by setting the isAccessibilityElement and accessibilityLabel properties.
Zucchini uses the Instruments tool to run your Javascript tests against the app.
Getting Started
Zucchini has a sample project which runs against Apple’s CoreDataBooks example project. Unfortunately there seems to be a bug in the current version – I fixed the bug and submitted a pull request but it hasn’t been accepted yet, so for the moment I would suggest you use my fork. I’ve also updated the readme so you should have a better idea of how to get it running.
To create a new Zucchini project you can use the Zucchini generate command. You can also generate your first feature.
zucchini generate --project /path/to/project
zucchini generate --feature /path/to/project/features/my_feature
You can choose to either generate this project inside you iOS project structure or in an entirely different folder – all Zucchini needs to know is the name of your app (if you’re running on a device) or the path of the app file (if you’re running on the simulator). I chose to generate the project inside my iOS project structure since I think that the tests should be maintained along with the code, but it’s nice to know that there is so little coupling between the two.
Zucchini will generate a default project structure, which is explained on the github wiki. There are three elements to your tests – the feature file, the screen file(s) and the masks. The feature file is a very straightforward DSL that calls functions in your screen file.
Start on the "Books" screen:
    Take a screenshot
    Tap "Add"

Then on the "New Book" screen:
    Take a screenshot
    Tap "Title"
(This is the example feature from the Zucchini demo project.) You start off by telling Zucchini what screen to use – the name you specify here must match the class name of the screen, except the screen’s class name must be in camelcase. Every subsequent line will be an action executed by the specified screen class. The default screen class already ships with a number of actions (such as ‘Take a screenshot’), but you can also define your own.
class BooksScreen extends Screen
  anchor: -> view.navigationBars()["Books"]

  constructor: ->
    super 'books'

    extend @elements,
    'Edit' : -> view.navigationBars()[0].buttons()["Edit"],
    'Add'  : -> view.navigationBars()[0].buttons()["Add"]

    extend @actions,
    'Scroll to "([^"]*)"$': (elementName) ->
      view.tableViews()[0].scrollToElementWithName(elementName)
The Javascript you write here is interacting with the UIA Framework I mentioned earlier. Here you can interact with any element that has isAccessibilityElement set to true and you should be able to access elements using the accessibilityLabel you define in your iOS code.
You can also get a dump of the current accessibility element hierarchy by writing a simple action like this:
'Show elements': ->
  view.logElementTree()
Here is a list of all built-in actions:
- Take a screenshot
- Take a screenshot named “x”
- Confirm “x”
- Wait for “x” seconds
- Cancel the alert
- Confirm the alert
- Select the date “x” (in the format DD Month YYYY)
- Tap “x”
- Type “x” in the “y” field
- Clear the “x” field
The last 3 actions are a bit special since they use the elements hash – you must define the element you’re naming if you want to use one of these actions.
The only part that I haven’t explained is the anchor. If you have an anchor defined zucchini will wait until that element is on the screen before continuing to the next step. So instead of having to put in a time delay while you transition to a screen you can simply define an anchor – basically an element which you know will be on the screen when it loads.
Running your tests
Now that you have your feature and screen(s) defined you’re ready to run your tests. Zucchini will parse your feature file, convert it to CoffeeScript, compile your CoffeeScript down to JavaScript and run your JavaScript against your app with the Instruments tool. Pretty neat!
To get this to work you will first need to edit your config file (located at features/support/config.yml). Specifically, you will need to set the device you’re running (either the simulator or an actual iPhone/iPad). If you’re using the simulator you will also need to set the full path to where you app file is located. For details on how to do this please have a look at the readme included with the demo project.
If you run into problems at this point make sure that you’ve installed ImageMagick and CoffeeScript using the instructions on the Zucchini github page. (You can check to see that CoffeeScript is working correctly by typing ‘coffee -v’ on the command line)
Once Zucchini is finished running it will open a browser window with a report of the test run. Your first run will usually look something like this.
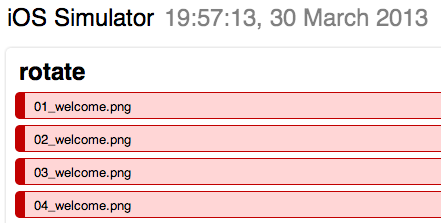
All the tests failed because you didn’t have any reference screenshots defined. You now need to take reference screenshots (basically what you expect your app to look like at the different steps in your test) and add the screenshots to features/login/reference/your-device-type/. The screenshots your test took are also available at features/login/run_data/Run 1/ if you simply want to copy them across.
Zucchini also allows you to put features into a pending state, which means the tests will run and you’ll see the output but they won’t actually fail – this is to allow you to write tests before the features are implemented or completed. There is also an approve command in the latest build which should allow you to mark the results of a test as reference screenshots.
As I mentioned earlier, in iOS you are basically guaranteed to get the exact same screenshot every time, with some exceptions. For example, the status bar will show a different time on every run of your tests. You might also have certain visual elements in your app which differs every time. This is where masks come in – masks allow you to ignore certain parts of the screenshot during the comparison. You can find out more about masks on the Zucchini github wiki.
Getting more information
Unfortunately the Zucchini framework is still lacking in good documentation. I am hoping that the information I’ve given here will help newcomers to get up and running with less frustration. Luckily the Zucchini Google Group is very active so if you’re really stuck don’t hesitate to ask a question there.
Zucchini is definitely a very interesting framework and can be very useful in testing content-driven applications. The source code is also reasonably straightforward to understand so don’t hesitate to dig a bit deeper if you’re searching for answers.
Happy coding.