The psql command-line interface for PostgreSQL lets you pass parameters into your SQL scripts using variables. The psql --help command explains how to accomplish this:
psql is the PostgreSQL interactive terminal.

Usage:
  psql [OPTION]... [DBNAME [USERNAME]]

General options:
  -f, --file=FILENAME      execute commands from file, then exit
  -v, --set=, --variable=NAME=VALUE
                           set psql variable NAME to VALUE
                           (e.g., -v ON_ERROR_STOP=1)
If I create this simple script:
SELECT*FROMcustomersWHEREid=:ID;
I can invoke it via psql:
psql --file=script.sql --variable=ID=2

 id | name
----+------
  2 | Bob
(1 row)
We immediately run into problems if we don’t consider how variables are interpolated.
psql --file=script.sql --variable=ID="Roger Wilco"
psql:script.sql:7: ERROR: syntax error at or near "Wilco"
LINE 6: id= Roger Wilco
^
Note that the variable is not being interpreted as a string, but rather directly substituted in the script itself. This is quite powerful, since it means we can pass in variables to substitute as the name of a table or column. It also means it’s extremely prone to SQL injection attacks.
psql --file=script.sql --variable=ID="42; SELECT VERSION();"id | name
----+------
(0 rows)
version
----------------------------
PostgreSQL 15.13 (Homebrew)(1 row)
Quoting Variables as Literals vs. Identifiers in psql
We need to tell psql to quote the variables. There are two ways to quote variables:
For quoting variables as a literal, use :'VARIABLE_NAME', for example SELECT * FROM customers WHERE id = :'USER_ID';
For quoting variables as an identifier, use :"VARIABLE_NAME", for example SELECT * FROM customers ORDER BY :"ORDER_BY_FIELD";
psql --file=script.sql --variable=ORDER_BY_FIELD=name --variable=LIMIT=5

 id |  name
----+---------
  1 | Alice
  2 | Bob
  3 | Charlie
  4 | Diana
  5 | Ethan
(5 rows)
One very important caveat is that psql actually parses the SQL in order to do the substitution, and cannot replace variables inside of a string. This becomes very important if you are trying to substitute variables inside of a pl/PgSQL function or DO block, since these are executed server-side and parsed as a string, making psql substitution impossible.
DO$$DECLAREcustomer_nameTEXT;BEGINSELECTnameINTOcustomer_nameFROMcustomersWHEREid=:'CUSTOMER_ID';RAISENOTICE'Customer % is named %',:'CUSTOMER_ID',customer_name;END$$;
Trying to pass the variable into this script will fail:
psql --file=script.sql --variable=CUSTOMER_ID=2
psql:script.sql:18: ERROR: syntax error at or near ":"
LINE 13: id= :'CUSTOMER_ID'
^
Unfortunately there doesn’t seem to be a standard way to pass variables into DO blocks, the best workaround I’ve seen is to use current_setting. The downside is that your variable is stored as a string, which means you need to consider casting it to the appropriate type.
SETcustom_settings.customer_id=:'CUSTOMER_ID';DO$$DECLAREcustomer_nameTEXT;BEGINSELECTnameINTOcustomer_nameFROMcustomersWHEREid=current_setting('custom_settings.customer_id')::INTEGER;RAISENOTICE'Customer % is named %',current_setting('custom_settings.customer_id'),customer_name;END$$;
psql --file=script.sql --variable=CUSTOMER_ID=2
psql:script.sql:20: NOTICE:  Customer 2 is named Bob
Note that you need to prefix/namespace your setting - as I did above with custom_settings - otherwise PostgreSQL will blow up thinking you are trying to access system configuration settings.
One last note - you can’t use variables with inline commands, since --command doesn’t parse variables unless input comes via stdin (e.g., from <<< or |), as it doesn’t treat SQL the same way as file or piped input.
psql --variable=NAME=Bob --command="SELECT :'NAME';"
ERROR:  syntax error at or near ":"
LINE 1: SELECT :'NAME';
               ^
Instead, we would need to use piping:
psql --variable=NAME=Bob <<<"SELECT :'NAME';"
?column?
----------
Bob
(1 row)echo"SELECT :'NAME';" | psql --variable=NAME=Bob
?column?
----------
Bob
(1 row)
Most of my knowledge in this post comes from this post by depesz. Variables in psql are powerful for dynamic scripting and automation — but they come with some gotchas. By understanding quoting rules and limitations (especially around DO blocks and inline commands), you can write safer, more maintainable SQL scripts. Happy scripting!
Active Record makes it easy to introduce N+1 queries into your Rails applications. The convenience of easily adding associations to your models means that great care is needed to avoid N+1 queries. I was therefore excited to see that Rails 6.1 introduced strict_loading to help alleviate some of these problems. I had previously used the bullet gem which adds visibility around these issues but built-in guardrails are a great addition to Rails. I came across this deep dive by Jordan Hollinger while researching strict loading, and it helped clarify some of the finer points—especially around n_plus_one_only.
Strict loading can be enabled at various levels: model, association, individual record, query, or across the entire application. Strict loading can be enabled in two modes - all and n_plus_one_only. You can also configure the action that is taken when a strict loading violation occurs, either raising an error or logging a warning.
Individual Queries
customers=Customer.preload(:addresses).where(id: ...).strict_loadingcustomers.each{|customer|customer.addresses.each(&:inspect)}# No errors, since addresses are pre-loadedcustomers.each{|customer|customer.statements.each(&:inspect)}# ActiveRecord::StrictLoadingViolationError
You can also disable strict loading, but there doesn’t seem to be an option to specify the mode.
customers=Customer.strict_loading(false).where(id: ...)customers.each{|customer|customer.statements.each(&:inspect)}# No errors (despite N+1 queries)
Individual Records
customer=Customer.find(...)customer.strict_loading!customer.statements.first# ActiveRecord::StrictLoadingViolationErrorcustomer.strict_loading!(mode: :n_plus_one_only)customer.statements.first# No errors
Model Level
classCustomer<ApplicationRecordself.strict_loading_by_default=true# New option in Rails 8.0self.strict_loading_mode=:n_plus_one_only# or :allendcustomer=Customer.find(...)customer.addresses.each(&:inspect)# ActiveRecord::StrictLoadingViolationError
# config/application.rbconfig.active_record.strict_loading_by_default=true# defaults to falseconfig.active_record.action_on_strict_loading_violation=:log# defaults to :raise# New option in Rails 8.0config.active_record.strict_loading_mode=:n_plus_one_only# defaults to :all
The different ways to enable strict loading make sense to me - if you’re creating a new application you will probably want to opt-in by default, but if you’re working on an existing application you might want to enable it by default and then selectively opt-out models, individual queries, or records. The association level doesn’t really make sense to me. I can’t see a compelling use case for it.
n_plus_one_only Mode
The n_plus_one_only mode can be confusing in practice. To illustrate how it works I have to create a few different associations.
This is a textbook example of when you’d expect strict loading to raise an error. Similarly, let’s load all the entries for each statement (since that’s a has_many association).
Note that both of these snippets correctly raise an error when I change the strict_loading_mode to :all. I’m not the first one to notice this behavior, there is a Rails Github Issue that funnily enough flags Strict Loading n_plus_one_only doesn't catch N+1 problem. The underlying idea behind n_plus_one_only appears to be avoiding errors when working with a single record, since eager-loading in that scenario could mean that you are loading data unnecessarily.
This will raise an error if strict_loading_mode is set to :all, but not if it is set to :n_plus_one_only. That makes sense to me - loading the data later on doesn’t make the query worse, but always pre-loading it could mean we’re loading unnecessary data - for example, if we pass the statement to a view that conditionally renders the entries. However, given how :n_plus_one_only behaves in other scenarios I don’t see how it makes sense to enable it globally. The problem seems to be that Rails simply doesn’t know whether you are accessing associations from within the context of a single record or a collection of records.
Conclusion
If you’re starting a new Rails application I think the only sensible options are
Ignore strict loading and continue to use the bullet gem (and be diligent about avoiding N+1 queries)
Enable strict loading globally in :all mode
I can maybe see a use case for enabling it globally and then selectively disabling it for individual records where you explicitly know that you don’t want to pre-load unnecessary data. I also prefer using the raise option for violations instead of simply logging, but I can also understand that this might seem too risky for some.
A completely different option might be to use Occams Record which avoids N+1 queries by default. I haven’t tried this in a real Rails application yet, but I am eager to do so.
PostgreSQL has a powerful feature called Lateral joins, which lets you reference columns from earlier tables in the FROM clause. This becomes especially useful when working with data that changes over time, like historical addresses or versioned records.
For example, consider a domain where we keep track of customers and statements. Customers can change their addresses over time, but it’s important that a statement has the appropriate historical address for a customer.
 id | name  |   address   | effective_on
----+-------+-------------+--------------
  1 | Alice | 123 Main St | 2024-01-01
  1 | Alice | 456 Oak Ave | 2024-04-01
  2 | Bob   | 789 Pine Rd | 2024-02-15
Think of the Lateral join as a kind of “for-each loop” inside SQL: for each row in statements, it runs a subquery on addresses using the statement_date. Without LATERAL, this would require a more verbose join with DISTINCT ON, a window function, or a nested subquery.
 id | statement_date | name  |   address
----+----------------+-------+-------------
  1 | 2024-02-01     | Alice | 123 Main St
  2 | 2024-05-01     | Alice | 456 Oak Ave
  3 | 2024-03-01     | Bob   | 789 Pine Rd
Over the past few years, I’ve become more of an advocate for tracking changes over time and using SQL to reconstruct the state of data at any given point. PostgreSQL’s LATERAL joins make this approach even more powerful, enabling elegant, performant queries that access related, time-sensitive records with minimal fuss.
Every time I run the rails new command I try to remember what options I prefer - of course, you can change things later, but if you’re looking to get up and running quickly it’s nice to get it mostly correct on the first try. I did an audit of all the options as of rails 8.0.2 and grouped them in a way that made sense to me, since the default output provided by rails new --help can be difficult to parse through.
Options You Definitely Want to Specify
--database=DATABASE specifies the database adapter to use. The options are sqlite3, postgresql, mysql, oracle, sqlserver, jdbc, and none. The default is sqlite3.
--javascript=JAVASCRIPT tells Rails which JavaScript bundler or integration to set up for your new application. The possible values are importmap, bun, webpack, esbuild, and rollup. The default is importmap.
--css=CSS tells Rails which CSS processor to use for your new application. The possible values are tailwind, bootstrap, bulma, postcss, and sass. The default is tailwind.
Options To Skip Components You Don’t Need
--skip-action-mailer tells Rails not to include Action Mailer in your new app. This means Rails will not generate any email-related folders like app/mailers, not configure default mailer settings in config/environments/* and not include action_mailer in config/application.rb.
--skip-action-mailbox tells Rails not to include Action Mailbox in your new application. Action Mailbox is a Rails framework that lets your application receive inbound emails and process them as part of your business logic.
--skip-action-text tells Rails not to include Action Text in your new application. Action Text is a built-in Rails framework for rich text content, powered by the Trix editor. It allows users to write formatted text and embed images and attachments.
--skip-active-record tells Rails not to include Active Record, the built-in ORM (Object-Relational Mapping) framework. This is probably the trickiest option to add later on if you decide to skip it at first.
--skip-active-job tells Rails not to include Active Job, the framework Rails provides for background job abstraction.
--skip-active-storage tells Rails not to include Active Storage, the built-in framework for file uploads and attachments. If you choose to skip it at first you can add it later with bin/rails active_storage:install.
--skip-action-cable tells Rails not to include Action Cable, which is Rails’ built-in framework for WebSockets and real-time communication.
--skip-asset-pipeline tells Rails not to include any asset pipeline, meaning it won’t set up tools to manage and compile JavaScript, CSS, or images.
--skip-javascript tells Rails not to set up any JavaScript tooling or files in your new application. By default Rails adds package.json, app/javascript/application.js, JavaScript helpers like @hotwired/turbo-rails and @rails/ujs and the relevant config based on your JavaScript approach (see --javascript=JAVASCRIPT).
--skip-hotwire tells Rails not to include Hotwire, the default real-time frontend stack introduced in Rails 7. This includes Turbo and Stimulus.
--skip-jbuilder tells Rails not to include Jbuilder, which is the default JSON response templating library in Rails. Jbuilder lets you build JSON responses using Ruby in .json.jbuilder templates. To add it later you simply add it to your Gemfile and run bundle install.
--skip-test tells Rails not to generate the default test framework, which is Minitest, and to skip creating test files entirely. This will exclude minitest from the Gemfile, skip creating the test folder, and also not generate test files if you’re using rails generate controller/model. Use it if you’re using RSpec or another test framework
--skip-system-test tells Rails not to set up system tests, which are end-to-end browser-based tests using Capybara. This option skips generating the test/system folder, application_system_test_case.rb, and does not configure Capybara or install any system test drivers. --skip-test implies that system tests will also be skipped, so --skip-system-test is redundant unless used alone.
--skip-bootsnap tells Rails not to include Bootsnap, which is a performance optimization library that speeds up boot time by caching expensive operations.
--skip-dev-gems is a new option in Rails 8 and tells Rails to omit development-specific gems from the generated application’s Gemfile. These gems are typically included to enhance the development experience but are not necessary for production environments, e.g. web-console and listen.
--skip-thruster is a new option in Rails 8 and tells Rails to exclude the setup for Thruster, a new HTTP/2 proxy.
--skip-rubocop tells Rails not to include the RuboCop gem and .rubocop.yml configuration file. In Rails 7.2, the rails new command began including RuboCop by default in newly generated applications.
--skip-brakeman tells Rails not to include Brakeman, a static analysis security scanner for Ruby on Rails applications. Brakeman scans your Rails codebase for potential security vulnerabilities — without needing to run the app or its tests. It’s commonly used in CI pipelines or local development to catch problems early.
--skip-ci tells Rails not to create the GitHub Actions CI workflow in .github/workflows/ci.yml. By default this Workflow runs tests and Rubocop.
--skip-kamal tells Rails to exclude the default setup for Kamal, a deployment tool integrated into Rails to simplify application deployment. To add it later you add it to your Gemfile, run bundle install, and then bin/kamal init.
--skip-solid allows you to exclude the default setup for Solid components, which include Solid Cache (A caching backend that stores cached data in the database), Solid Queue (A database-backed job queue system that serves as the default Active Job backend), and Solid Cable (A database-backed Action Cable adapter for real-time features).
--skip-docker tells Rails to skip generating the docker config like Dockerfile and bin/docker-entrypoint. By default Rails will not generate the docker config, but this guards against a template or future config change enabling it by default. There is also a --docker option, but it’s not listed in rails new --help, because it’s considered an internal or ‘hidden’ option right now.
--devcontainer, --no-devcontainer, and --skip-devcontainer control whether a Dev Container configuration is generated for Visual Studio Code’s Remote - Containers / Dev Containers feature. --no-devcontainer and --skip-devcontainer are synonyms. By default Rails will not generate Dev Containers.
Options For the Generator Itself
--skip-collision-check tells Rails to overwrite existing files. By default, Rails will refuse to overwrite existing files like Gemfile, .gitignore, etc.
--ruby=PATH changes the shebang (#!) at the top of generated scripts like bin/rails and bin/rake. The default is #!/usr/bin/env ruby.
template=TEMPLATE allows you to specify a custom Ruby script that will run during project generation. It allows you to automate additional setup steps, like adding gems that you always include (devise, rubocop, standardrb, etc) and run generators. TEMPLATE can be a path to a file or a remote URL.
--skip-git tells Rails to skip all the git commands after generating the new app. By default Rails will run git init, stage all the files with git add . and make an initial commit. This option also skips the .gitignore file.
--skip-keeps means Rails won’t create any .keep files — so empty folders will truly be empty. That means they may be missing from Git until something is added.
--rc=RC lets you specify a file path for load additional options for the rails new command. By default, Rails looks for a .railsrc file in your home directory (~/.railsrc). If you want to prevent Rails from loading any .railsrc file, you can use the --no-rc option.
--skip-bundle tells Rails not to run bundle install automatically after generating the new app.
--skip-decrypted-diffs tells Rails not to setup a Git filter to show decrypted diffs for credential files. Rails uses encrypted credentials (like config/credentials.yml.enc) to securely store sensitive information. By default, Rails can configure Git to automatically show the decrypted contents of these files when viewing diffs, making it easier to see what has changed.
Grouped Options
--api, --no-api, and --skip-api control whether the generated application is a full-stack Rails app or a lightweight API-only app. API-only apps are optimized for serving JSON and exclude views, helpers, assets, and various other behaviors not typically needed in API-only applications. By default Rails assumes you are building a full-stack application, so equivalent to --non-api.
--minimal creates a lightweight Rails application by excluding several default frameworks and tools. This applies several of the --skip-* options and excludes components such as Active Job, Action Mailer, Action Mailbox, Active Storage, Action Text, Action Cable, JavaScript, Hotwire, Jbuilder, System tests, Bootsnap, Development gems, Brakeman, Rubocop, CI configuration files, Docker setup, Kamal, Solid components, and Thruster. By default Rails assumes you are building a non-minimal application, so equivalent to --non-minimal.
Options You Will Probably Never Use
--dev, --no-dev, and --skip-dev are special internal flags meant for Rails contributors or advanced users working on Rails itself. This allows you to tell Rails to generate the app using the local checkout of the Rails framework, instead of pulling gems from rubygems.org.
--edge, --no-edge, and --skip-edge control whether the newly generated application uses the edge branch/version of Rails through configuration in the Gemfile. --no-edge / --skip-edge are aliases that explicitly say: ‘don’t use edge Rails.’ They’re rarely needed unless you’re overriding an inherited or default behavior. Similarly, the --master, --main, --no-main, and --skip-main control the same behavior, but for pointing at the main branch.
Options for Engines and Plugins
--skip-namespace is used when generating engines or plugins, not during normal app creation. So if you’re doing rails new myapp then it does nothing. If you’re generating a plugin, i.e. rails plugin new my_plugin by default, Rails namespaces everything under the plugin name — so MyPlugin::Engine, MyPlugin::ApplicationController, etc. This options allows you to skip that.
--name=NAME is used with the rails plugin new and rails engine new generators - and not with normal app creation. It sets the internal Ruby module/class name for the plugin or engine independent of the directory name.
My Default Options
Here are my default options for rails new:
rails new my_app \--database=postgresql \--javascript=esbuild \--css=bootstrap \--skip-action-mailbox\--skip-action-text\--skip-action-cable\--skip-jbuilder\--skip-test\--skip-thruster\--skip-kamal\--skip-solid\--skip-decrypted-diffs
--skip-test because I generally use rspec, not minitest.
--skip-jbuilder since I can easily add it if I need it later on.
--skip-solid because I only really use Solid Queue, so I install that separately.
--skip-kamal because I generally deploy to Heroku. For the same reason, I also --skip-decrypted-diffs, since I prefer to use Heroku environment variables for credentials.
I want to look into the --template option, since that seems like a great way to add all the other defaults that I can’t configure from rails new, such as standardrb and rspec.
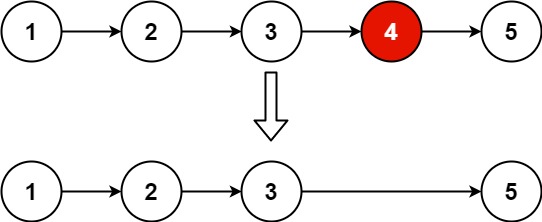
Now onto the actual solution. Since this is a linked list we can’t simply walk all the way to the end of the list and then backtrack. Instead I found it useful to think of the desired end state of the algorithm - we want to end up with a pointer pointing to the node before the nth node from the end of the list. So in the example of [1, 2, 3, 4, 5] we want a pointer at the 3 node, which is the third node from the end, in order to be able to do p.next = p.next.next.
The trickiest part of this algorithm is the edge cases - I got a bit stuck on how to solve for [1, 2] with n = 1 (the result being [1]) and n = 2 (the result being [2]). Then I realized that when the size of the list is the same as n, that is a special case where you return head.next. In all the other cases I can modify the list and return head.
I didn’t really enjoy doing this algorithm as much as the dynamic programming one. I’m doing the algorithms because it’s something I enjoyed doing when I was a student, and it helps to bring back some of the joy of programming for it’s own sake. Maybe I’ll stick to the ‘hard’ questions, or at least questions where a brute force answer is easy but an optimal one takes some creativity.