Authentication with OpenId–Part 2
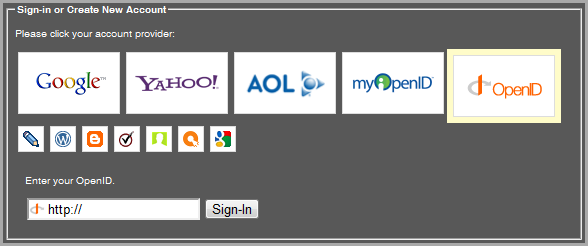
I my last post I created a very simple example of how to authenticate users with OpenId. In that example the user needed to enter the full URL to their OpenId provider. Today I’m going to modify that example to make the authentication process a little easier on the user. To give you an idea of what I’m going on about, take a look at the login form for StackOverflow.

Alternatively you can manually enter your OpenId (which is the only option I provided in the sample application).
The key to understanding how this works is to realize that for a user to authenticate with their OpenId provider they need to enter the URL pointing to that OpenId provider. However, for certain OpenId providers the URL will be the same for all users, while for others each user has a unique URL. For example, if you would like to login with your Google account you would enter the URL https://www.google.com/accounts/o8/id. (So in our previous example you could enter this as your OpenId URL) This URL is used for all Google accounts. However, if you’re using Blogger as your OpenId provider you need to enter http://youraccount.blogspot.com as the URL – the URL is different for every Blogger account. So if you want to login with your Google account you simply need to click the Google icon and you will be redirected to the single URL used for all Google accounts, but if you want to login with Blogger you need to be prompted for your account name.
OpenId Selector
OpenId Selector is an open source project that allows the user to select one of the popular OpenId providers and then either redirects them to the common URL for that provider or prompts the user for the necessary information and then redirects the user to their unique URL. This is all done with some JavaScript magic.
It’s incredibly straightforward to integrate OpenId Selector into your project. First, download the latest version from their site. You will need to include the 2 JavaScript libraries into your project. OpenId Selector uses jQuery so you will also need to reference that.
<script src="<%=Url.Content("~/Scripts/jquery-1.4.1.min.js") %>" type="text/javascript"></script>
<script src="<%=Url.Content("~/Scripts/openid-jquery.js") %>" type="text/javascript"></script>
<script src="<%=Url.Content("~/Scripts/openid-jquery-en.js") %>" type="text/javascript"></script>
Also add the StyleSheet included with the project.
<link rel="stylesheet" href="<%=Url.Content("~/Content/OpenId/openid.css")%>" />Now you need to include all the images. By default OpenId Selector assumes you put everything into a folder called Images, but I decided to put it into a folder called OpenId within my Content folder. There are 3 folders you need to copy – Images, Images.small and Images.large. You will also need to modify the openid-jquery.js file to specify the location of the images.
img_path: '/Content/OpenId/Images/',That’s pretty much all we need to do for the JavaScript and StyleSheet includes. Let’s take a look at the actual Html we need to include.
<% using(Html.BeginForm("Authenticate", "User", FormMethod.Post, new { id = "openid_form" })) { %>
    <input type="hidden" name="action" value="verify" />

    <fieldset>
            <legend>Sign-in or Create New Account</legend>

            <div id="openid_choice">
                <p>Please click your account provider:</p>
                <div id="openid_btns"></div>
            </div>

            <div id="openid_input_area">
                <input id="openId" name="openId" type="text" value="http://" />
                <input id="openid_submit" type="submit" value="Sign-In"/>
            </div>
            <noscript>
            <p>OpenID is service that allows you to log-on to many different websites using a single identity.
            Find out <a href="http://openid.net/what/">more about OpenID</a> and
            <a href="http://openid.net/get/">how to get an OpenID enabled account</a>.</p>
            </noscript>
    </fieldset>
<% } %>
From looking at the StyleSheet and JavaScript it’s reasonably straightforward to figure out which of the Id’s you can change and which are required. In my case I only changed the name of the text input.
Lastly we simply need to invoke the JavaScript by passing the id of the text input.
$(document).ready(function () {
    openid.init('openId');
});
And that’s it! Now the user can choose their OpenId provider and all of the code will still work on the server. I really am a fan of the OpenId Selector library. Make sure you play around with the different options available – you will need to edit the JavaScript file to do this.

Happy coding.