Lightweight Test Automation Framework – Automated Build Support
In my last post I had a look at Microsoft’s new Integration Testing platform for web applications, the Lightweight Test Automation Framework. I’ve had some feedback from one of the developers for the framework and I’ve decided to take a look at how we can address some of the issues I raised, rather than just moan about them.
Firstly, they have started calling the project LTAF so I will be doing the same.
In this post I will try and solve one of my main concerns with the framework – no automated build support. While support for integrating with a build process is in the pipeline, I’m going write a quick implementation that can be used until then. This was done using the June update of LTAF.
Writing a Test Runner
Since the interface for running the tests is web-based, the easiest implementation for a test runner would be to automate the web requests. There are 2 ways of doing this – we can either manually create an HttpWebRequest using the WebRequest.Create() method or use the System.Windows.Forms.WebBrowser control. Both methods have advantages and disadvantages – with the HttpWebRequest we need to stream the response manually and with the WebBrowser control we would need to run in a Single-Threaded-Apartment (Sta) threading model. I decided to use the WebBrowser control since the page will be running javascript which you can’t do with the HttpWebRequest.
Automating the Request
LTAF contains support for selecting and running tests through parameters passed in the url. The default mechanism for selecting tests is to mark them with a certain tag (in code) and then specifying that tag in the url. We can also specify that the tests must be run automatically and the results must be logged. In this case we want to run all the tests, so the url will look something like this:
http://localhost:54497/SampleWebSite/Test/?tag=all&log=true&run=true
If you open this url in your browser all tests will be executed and the results will be written to a file called TestLog.txt in the same directory as the test page (by default this is in the \Test folder).
Let’s write some code
I implemented the runner as a console application. I am also passing 2 parameters via the command-line: the url of the website and the directory where the website resides.
The only tricky part is knowing when the run is completed – since the tests are executed mostly through javascript the easiest way to do this is to monitor the file system to see when the results are written to file. In my implementation I am checking the file system every second for the results file.
public void RunTests()
{
    File.Delete(Path.Combine(Arguments.WebDirectory, @"Test\Startup.txt"));
    File.Delete(Path.Combine(Arguments.WebDirectory, @"Test\TestLog.txt"));

    browser = new WebBrowser();
    browser.Navigate(Arguments.WebUrl + @"/Test/?tag=all&log=true&run=true");

    new Thread(CheckForRunCompleted).Start();
}

private void CheckForRunCompleted()
{
    var logFile = Path.Combine(Arguments.WebDirectory, @"Test\TestLog.txt");

    while (true)
    {
        if (File.Exists(logFile))
        {
            break;
        }

        Thread.Sleep(1000);
    }

    CompletedEvent(logFile);
}
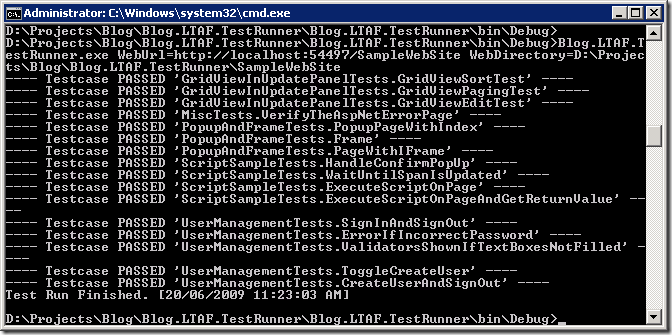
The console application parses the arguments, starts the request and writes the results to the console window.
class Program
{
    [STAThread]
    static void Main(string[] args)
    {
        var arguments = ArgumentParser.Parse(args);
        if (arguments != null)
        {
            var host = new BrowserHost(arguments);

            host.CompletedEvent += RunCompleted;
            host.RunTests();

            Application.Run();

            host.CompletedEvent -= RunCompleted;
            host.Dispose();
        }
    }

    private static void RunCompleted(string logFile)
    {
        foreach (var line in File.ReadAllLines(logFile))
        {
            if (line.Contains("Testcase FAILED"))
            {
                Environment.ExitCode = -1;
            }

            Console.WriteLine(line);
        }

        Application.Exit();
    }
}
Nothing to it. For the tests to run you first need to host your website, either through the ASP .Net Development Server or through IIS. By default Visual Studio will host your website using the Development Server.

Continuous Integration
When the run is completed I write the output to the console window and look for any failed tests. Setting the exit code should indicate a failure – for most Continuous Integration solutions this should cause the build to fail.
Unfortunately the results from the log file aren’t very informative – I would prefer to see the time each test took to run as well as the stack trace from any failed tests.